Building a shed on a sloped yard brings unique challenges that homeowners face daily. Your property’s uneven terrain with height differences up to 3′ between corners makes standard shed foundation methods fail.
Gravel foundations with lumber perimeters work better than concrete, and they don’t get pricey. You’ll need to think about foundation blocks or small retaining walls that give you flexibility and proper drainage. Concrete blocks give you the quickest way to level uneven ground for a shed. Other methods might serve you better for stability over time.
This piece walks you through the essentials of building a stable, level shed on tough terrain. We’ve packed it with practical advice to help you dodge expensive mistakes. You’ll find everything from picking the right foundation to clear building steps that work.
Choosing the Right Shed Foundation for a Sloped Yard
Your choice of foundation plays a vital role when you build a shed on sloped terrain. The foundation determines your structure’s stability and protects it from moisture damage over time.
Gravel base: best all-around option
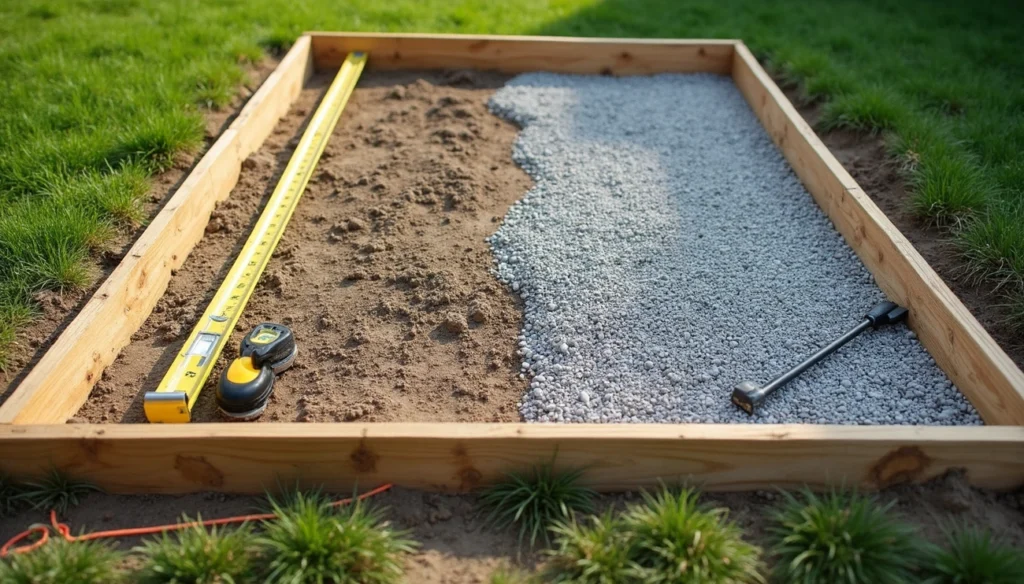
A gravel foundation with a lumber perimeter stands out as your best bet for a shed on a sloped yard. This foundation gives you excellent drainage and keeps your shed’s bottom safe from rot and moisture damage. Gravel works better than point-support systems because it spreads your shed’s weight evenly across the whole structure.
Gravel bases work great on sloped sites. You can dig out or build up the ground – or do both – to get your shed door at ground level, no matter which side faces the slope.
Money-wise, gravel foundations cost nowhere near what you’d pay for concrete but last just as long. You’ll want at least 5 inches of depth in your gravel base. Once it’s packed down tight, this base will keep your shed stable for years.
When to consider concrete or screw piles
Sometimes you’ll need something besides gravel. Local building codes might require frost-proof footings – that’s when you should mix gravel with concrete piers that go below the frost line. This combo gives you great drainage plus the structural stability your local regulations demand.
Screw piles (also called helical piers) work really well, especially on sites with height differences more than three feet. Builders have used these metal screws in homes since the 1990s. You just twist them into the ground until they reach the right depth. These are great because you can set each pier at a different height to level everything out.
Screw piles are a big deal as it means that installation takes under 2 hours, while concrete needs 48+ hours to set. These piles usually come with a 25-year warranty, making them a smart long-term investment.
Why concrete blocks are not ideal for long-term use
Many prefab shed companies use concrete blocks by default, but these blocks cause problems down the road. The biggest problem is that blocks only support your shed at certain points instead of across the whole bottom. This leads to uneven settling because blocks sink at different speeds.
Your shed’s frame takes extra stress when it settles unevenly. Windows and doors start sticking and won’t work right. In the worst cases, your whole shed might start leaning to one side.
Concrete blocks make sheds unstable on sloped sites. They don’t work well in areas where frost happens and might even void some prefabricated shed warranties.
Step-by-Step Guide to Building a Gravel Shed Base on a Slope

A sturdy foundation serves as the crucial first step when you build a shed on a sloped yard. Let’s take a closer look at how to construct a reliable gravel base that will keep your shed level for years.
1. Select a suitable location
Your ideal spot should have good drainage, preferably at the highest point in your yard. Water pooling areas during heavy rain should be avoided. The site needs minimal slope since steeper terrain demands more excavation and materials. You should build on undisturbed ground to prevent future settling. Safety comes first – call 811 to mark any utility lines. Your construction must stay at least 24″ away from these lines.
2. Gather tools and materials
You’ll need these items:
- Measuring tools: tape measure, level (preferably 48″ or longer), string
- Digging tools: shovel, rake, tamper, or plate compactor
- Construction tools: drill with ½” auger bit, circular saw, sledgehammer
- Materials: pressure-treated lumber (4×6 recommended), ¾” crushed stone, landscape fabric, ½” rebar, 4″ exterior screws
You can rent a plate compactor for $80-$100/day to compact your gravel properly.
3. Mark the perimeter and measure the slope
Start by marking corners with stakes. Your pad should extend at least 12″ beyond your shed’s dimensions on all sides. Make sure your corners form a square by measuring diagonals – both measurements must match. String lines will help determine the slope gradient when you measure from the high point to each corner.
4. Excavate and level the site
Door placement determines your approach:
- Build-up: Doors on the uphill side need the downhill end built up
- Dig-out: Downhill doors require slope excavation
- Combination: Steeper slopes might need both methods
You should remove 4-6″ of topsoil from the entire area.
5. Build and anchor the wooden perimeter
Begin at the lowest point by installing pressure-treated lumber (4″ side down) around the perimeter. Each piece needs to be level before securing. Additional courses go where needed for a level frame. Secure the corners with 6-8 screws per joint and attach each piece to the course below. The lumber needs 2 rebar stakes driven through drilled holes for firm anchoring.
6. Add construction fabric and gravel
Cover the excavated area with landscape fabric. Fold several inches up the perimeter’s sides and staple it in place. Add 4-6″ of ¾” crushed stone. Pea gravel won’t work as it shifts too easily. A straight board helps level the gravel, and a plate compactor or hand tamper ensures proper compaction.
Leveling Techniques for Uneven Ground
Level ground is the lifeblood of any successful shed project on sloped terrain. Small mistakes during this stage can create structural issues later.
Using string lines and stakes to measure slope
You need basic but effective tools to measure slope correctly. Start by placing stakes at each corner where you plan to build. The best way to get reliable results is to stretch Mason’s line (non-stretchy string) between the stake at the highest corner and each corner you want to measure. A string level attached to the line will ensure it stays perfectly horizontal.
The level string lets you measure the vertical distance from the string to the ground at each corner. These measurements show the exact height differences. This simple math helps you find your slope percentage: take the measured height (rise), divide it by the measured length (run), and multiply by 100.
A laser level works great if you prefer to work alone. It gives readings at all corners from the highest point. Small shed foundations can also use a straightedge with a traditional level.
Build-up vs dig-out vs combination method
Your door placement and how steep the slope is will determine the right leveling approach. The build-up method works best with an uphill door. You’ll need to build up the downhill end to create a level surface. The dig-out method shines with a downhill-facing door. It requires cutting into the slope to make a level area.
Steeper slopes need the combination method. This approach works by digging out the uphill section while building up the downhill part. You can use the soil from uphill to create a ramp leading to the downhill door.
How to tamp and compact gravel for stability
Proper compaction turns loose gravel into a solid foundation. Begin compacting 12 inches from the edge and work inward using circular or spiral patterns. This method gives you even compaction throughout the base.
Place your tamper on an outside corner for the best results. Walk clockwise along the edge. Complete a full circuit, step inward, and repeat until you’ve compacted all the gravel. A plate compactor gets the job done quickly, but smaller projects can use a hand tamper.
Check the level often as you tamp. Use a 2×4 with a level on top. This helps you spot any uneven areas that need fixing before you finish the foundation.
DIY vs Hiring a Professional: What to Consider

You’ll face two big choices when deciding between DIY and professional installation for your shed on a sloped yard: money and time. Let’s get into both aspects to help you pick what works best for you.
Cost comparison of DIY vs contractor
DIY and professional installation costs differ quite a bit. Building your own shed saves you hundreds, maybe even thousands of dollars, because you don’t pay for labor. You also get to pick your materials freely and can choose affordable options when needed.
Here’s what the real numbers look like:
| Approach | 8×10 Shed | 10×16 Shed |
|---|---|---|
| DIY Build | $1,100 | $1,700 |
| Contractor Hire | $3,300 | $5,100 |
| Pre-made Shed | $5,500 | $8,100 |
Note: Costs in USD
These numbers show why homeowners often choose DIY. In spite of that, building on a slope needs more materials and time than flat ground construction. Your budget should include extra money for site prep materials like gravel, lumber for retaining structures, or drainage solutions.
Time, skill, and practicality factors
DIY saves money but takes much more time. A skilled DIY builder with help might finish a basic shed in one weekend, but a custom structure could take two weeks or more. Sloped terrain makes everything more complex.
Professional installers work faster—often finishing in hours—and handle everything from permits to materials. This complete service becomes especially valuable when you lack time or construction skills.
Your skill level matters too. Mistakes on sloped sites can lead to unstable structures and expensive fixes later. Taking time off work to build your shed might eat into those material savings.


