Want to build your own shed kit? You’re headed toward the most important savings. A shed kit has almost everything you need to construct your own storage shed and costs nowhere near what professionals charge to build a custom shed from scratch.
Your shed-in-a-box arrives ready for assembly with pre-cut materials, hardware, and easy-to-follow instructions. The appeal of these kits is undeniable, whether you’re thinking over compact she shed kits or larger options to build your own storage shed kit. These kits are a great way to get all components in one package, plus you’ll feel satisfied completing a DIY project.
Building enthusiasm aside, you should know what’s actually involved. The best shed kits aim to be user-friendly, but many DIY shed projects remain unfinished because of unexpected challenges, material damage, or missing proper equipment. In this piece, we’ll show you the money-saving truth about building your own shed and help you decide if this project matches your needs and skills.

Why People Choose to Build Their Own Shed Starting from a Kit
DIY shed kits have become a popular choice among homeowners nationwide as an affordable alternative to pre-built structures. This trend goes beyond simple tool storage—it represents a way to maximize value, express creativity, and create individual-specific spaces that match exact needs.
Cost savings and budget control
People choose to build their own shed kits mainly because of the financial benefits. You save money on professional labor by handling the assembly yourself, which lets you get a higher-quality shed at a lower price. These labor savings add up quickly, making shed kits an economical option for homeowners watching their budget.
To name just one example, a simple 6×6 DIY shed kit costs around $995, while larger 10×12 options run approximately $2,097. Building from scratch might cost between $10 to $150 per square foot depending on your material choices. DIY projects might face unexpected costs, yet they still offer substantial savings compared to professional installation.
DIY satisfaction and learning experience
Personal fulfillment drives many people to choose shed kits. Customers often say building their shed gave them a deep sense of pride. This satisfaction goes beyond just completing the project—it includes valuable skills gained during construction.
One Reddit user shared: “The skills you will learn will serve you for a lifetime. Plus a satisfaction of having built it yourself is a real plus”. This hands-on experience surpasses the value of the physical structure—each mistake teaches something new, and each success builds confidence for future projects.
Flexibility in design and use
DIY shed kits stand out because they offer complete customization freedom. You can create exactly what you need, unlike pre-built sheds with fixed designs.
People have turned their shed kits into:
- Functional workshops for woodworking and repairs
- Cozy backyard retreats and relaxation spaces
- Organized storage for garden tools and equipment
- Art studios or creative spaces
It also helps that shed kits let you build at your own pace instead of working around a contractor’s schedule. This project timing control makes DIY shed kits perfect for busy homeowners or those with unpredictable schedules.

What to Expect When You Build Your Own Storage Shed Kit
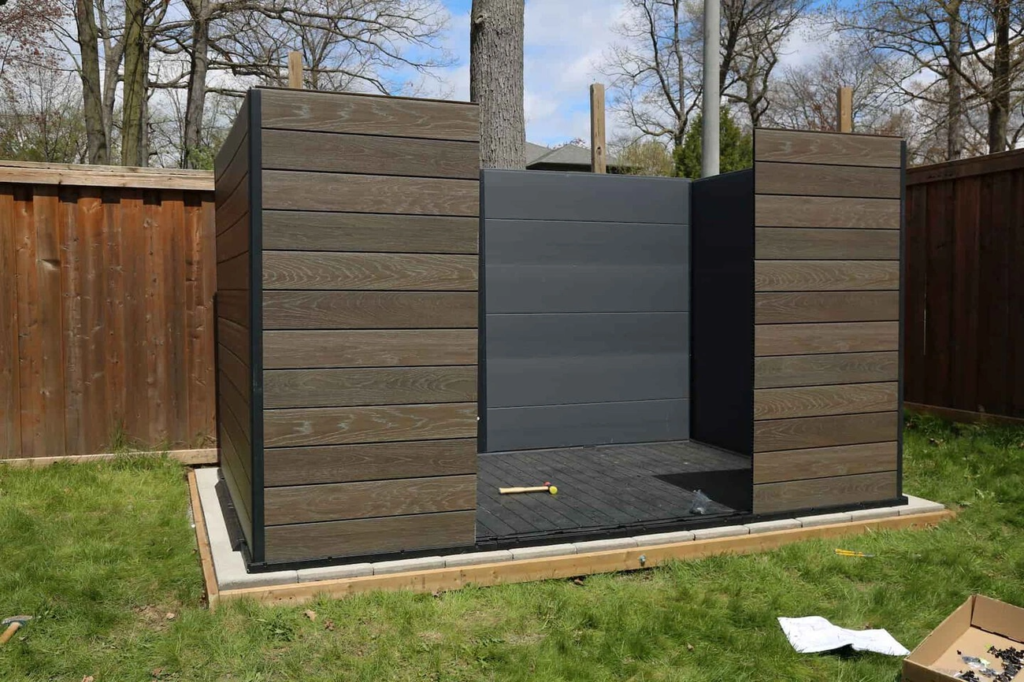
Building your own shed is more than just a weekend project. It needs careful planning and realistic expectations. Let’s look at what it really takes to put together a shed kit by yourself.
Time commitment and realistic timelines
A simple shed kit takes one to three days to assemble based on your construction experience and the shed’s size. This timeline works only in perfect conditions with no interruptions. You should plan for bad weather, getting tired, and unexpected problems that might come up.
Custom or larger sheds need much more time. Even builders with experience can’t finish a custom outdoor shed in a couple of weekends. The whole process can take several weeks to months. This includes design, permits, getting the site ready, and building it.
Tools and skills you’ll need
Shed kits work well for amateur builders, but some building experience helps a lot. You’ll need these basic tools:
- Basic hand tools: Measuring tape, hammer, level, square, and utility knife
- Power tools: Drill, circular saw, and possibly a miter saw
- Safety equipment: Gloves, eye and ear protection
Without doubt, your best “tools” are extra helpers! Having people help cuts down installation time substantially. One person can handle tools while another puts pieces together.
Common mistakes and how to avoid them
The foundation matters most—never put a shed right on soil. This will make it sink, move around, and get water damage. Many DIYers build sheds too small and regret it later because they didn’t think about how much storage they needed.
People often forget about building permits too. Your local government might need permits for bigger sheds. Skip this step and you could end up tearing down your finished shed.
Poor planning wastes materials and creates weak structures. Make sure to square up your floor and walls correctly. If you start with crooked angles, you’ll have problems through the whole project.
Featured Shed Kit Resources
Barn Shed Kits
Strong wooden construction, loft options, and detailed instructions—great for workshops and storage.
- Guide to barn shed kits
- Lofted barn-style shed kits
- Installation & assembly tips
Amazon Shed Kits
Huge selection of wood, metal, and resin shed kits with fast shipping and customer reviews.
- Popular shed kits on Amazon
- Budget-friendly shed kits
- Prime-eligible shed kits
Jamaica Cottage Shop Kits
Rustic, handcrafted New England–style shed kits with heavy-duty post-and-beam framing.
- Top Jamaica Cottage Shop shed models
- Prefab vs. kit comparison
- Customization options
The Pros and Cons of DIY Shed Kits
Building your own shed kit needs a good look at what works and what doesn’t. Let’s get into what you’ll love—and might struggle with—during this project.
Pros: affordability, convenience, pride of ownership
Money savings stand out as the best reason to pick DIY shed kits. You’ll save 30-50% compared to pre-built options since you won’t pay for labor costs. These kits show up with pre-cut materials and complete instructions, so you won’t hunt for individual parts.
The satisfaction of building something yourself goes beyond saving money. You’ll feel proud every time you look at your finished structure.
Cons: complexity, time, potential for errors
These kits might be designed for beginners, but you’ll still spend anywhere from a weekend to several weeks putting them together, depending on size and complexity. You’ll also just need simple tools like drills, saws, measuring tapes, and levels.
Weather can throw a wrench in your plans. Rain, snow, or extreme temperatures might slow down your project and affect its quality. One wrong measurement or cut means you might have to buy new materials.
Are shed kits good for beginners?
Yes, it is true that most shed kits work well for amateur builders, making them available to newcomers. Notwithstanding that, some construction knowledge helps, and having a helper makes sense—two people can finish the job in half the time.
Smaller resin shed kits give beginners an easier start than larger wooden ones. A full picture of your skills matters—if construction isn’t your thing or you don’t like following detailed instructions, you might want to hire a professional.
How to Choose the Best Shed Kit for Your Needs
The perfect shed kit depends on several significant factors that match your specific needs. Let’s think over the main materials you can choose from:
Comparing wood, resin, and metal kits
Wood kits give you classic esthetics and excellent customization options but need ongoing maintenance against rot and insects. Resin (plastic) sheds are a great choice. They stand up well to weather damage, need minimal upkeep, and deliver good durability at a medium price point ($800-$2500). Metal options make the most economical choice ($500-$2000). They might rust in humid environments and don’t provide much insulation.
Size and purpose: from she shed kits to workshops
Your shed’s dimensions should fit both current and future needs. The experts say it best: “No one regrets going bigger—but many regret going too small”. A small 6×8 structure works well for simple gardening tools. Medium 8×10 options can fit riding mowers and bicycles. Large 12×20 sheds match single-car garages and give you room for workshop setups with workbenches and tool walls.
Top features to look for in the best shed kits
These elements will help maximize your satisfaction:
- Foundation options – The shed should never sit directly on soil to prevent movement and water damage
- Ventilation – You need this to prevent moisture buildup, especially in humid areas
- Weather resistance – Check snow and wind ratings that suit your region
- Customization potential – Look for pre-designed shelving or walls that support hooks
Conclusion
DIY shed kits strike a perfect balance between saving money and feeling proud of your work. This piece shows how these kits can save you 30-50% compared to pre-built sheds. You’ll also feel great knowing you built something lasting with your own hands.
Note that setting realistic expectations is key to success with your shed project. These kits are often marketed as weekend projects, but they can take several days or weeks to complete, depending on size and complexity. Of course, having the right tools, some helping hands, and a solid plan can make the difference between pulling your hair out and enjoying the build.
You’ll need to pick between wood, resin, or metal based on what you need, your local weather, and how much maintenance you want to do. The size of your shed matters too – people rarely regret going bigger, but plenty wish they’d built a larger shed.
These shed kits are perfect if you want something between a custom-built shed and one that comes ready-made. They can be challenging, but they’re a great way for homeowners to create their own outdoor space without spending too much.
Here’s the real deal about shed kits: they’re worth every penny if you’re ready to put in some sweat equity instead of just cash. Your shed won’t just be a place to store stuff – it’s proof that you can handle serious DIY projects. Do your homework, plan it right, and you’ll turn that box of parts into something valuable that’ll last for years.
FAQs
Q1. Is building a shed from a kit more cost-effective than buying a pre-built one? Yes, building a shed from a kit can be significantly more cost-effective. You can save 30-50% compared to pre-built options by eliminating labor costs. However, keep in mind that you’ll need to invest time and effort into the construction process.
Q2. How long does it typically take to assemble a shed kit? The assembly time for a shed kit varies depending on size and complexity. A basic kit might take 1-3 days for an experienced DIYer, while larger or more complex sheds could take several weeks. Weather conditions and your skill level can also impact the timeline.
Q3. What tools are necessary for building a shed kit? Essential tools for assembling a shed kit include basic hand tools like a measuring tape, hammer, level, and utility knife. You’ll also need power tools such as a drill and circular saw. Don’t forget safety equipment like gloves, eye protection, and ear protection.
Q4. Can a DIY shed kit increase my property value? While not explicitly mentioned in the article, a well-constructed shed can potentially increase property value by adding functional storage space and improving the overall appearance of your property. However, the impact on value can vary depending on the quality of construction and how well it complements your home.
Q5. What are the main advantages of choosing a resin shed kit over wood or metal? Resin (plastic) shed kits offer several advantages. They are highly resistant to weather damage, require minimal maintenance, and provide good durability. Resin sheds are also typically easier to assemble than wood or metal kits, making them a good choice for beginners. They fall into a medium price range, usually between $800 and $2500.