My research into tuff shed reviews showed a solid 3.9 average rating from over 3,164 customers. I bought the TR-800 10′ x 12′ model with several upgrades, and looking back, I wish I had known more about the whole ordeal from selection to installation.
The tuff shed installation process, potential risks, and cost breakdown were my main concerns. The same-day delivery and installation sealed the deal for me. It helped that Tuff Shed has been America’s leading provider of installed storage buildings since 1981.
This owner’s guide details my experience with Tuff Shed. You’ll read about comparing options, customizing my building, and tackling installation challenges. I made some changes after installation too. As I wrote in this piece, the shed’s performance over time will help you decide if it’s worth your investment. This is the honest review I wish I had found before making my purchase.
Why I Chose a Tuff Shed
I started looking for a Tuff Shed because I badly needed more space. My home office was overflowing with tools, outdoor equipment, and work supplies. I knew I needed a solution that would last and actually work for my needs.
Needed extra space for work and storage
Just like other homeowners, I ran out of room to store my stuff. My garage turned into an obstacle course of outdoor gear. Tools were everywhere in the house. Working from home became impossible with all the mess around me.
I needed a building that could do double duty – store seasonal items and give me a quiet workspace away from house noise. After thinking over room additions and garage renovations, a standalone shed seemed like the best way to go.
What caught my eye about Tuff Shed was how flexible their buildings are. Their customers across the country have used them in a million different ways – from basic storage to complete home offices. This showed me their products could grow with my changing needs.
Compared with other shed brands
I looked at several shed makers including Graceland, Derksen, and local builders. While reading tuff shed reviews, I found that there was over 1.5 million of their buildings installed nationwide. This track record gave me confidence in their expertise.
Price was one of the most important factors. Home Depot sells Tuff Sheds about $700 cheaper than buying straight from Tuff Shed. Some customers mentioned possible differences in materials, so I checked both options carefully.
The reviews I read were mixed. Some people loved their sheds even after 10+ years. Others preferred brands like Graceland and Derksen, saying they had better construction and materials. One customer’s Graceland shed lasted over 15 years with minimal upkeep.
I went to local showrooms to see the sheds in person. Tuff Shed won me over because they manufacture locally. They hire local sales and manufacturing teams, so the people building my shed would know what works best for our area’s weather.
Their warranties (up to 10 years) helped me feel secure about my investment. The professional installation that comes with purchase was another big plus in my decision.
Why prefab made more sense than DIY
Building my own shed seemed like a good idea at first. I enjoy DIY projects, and creating something from scratch really appealed to me. In spite of that, the practical benefits of a prefab shed made more sense.
Time was a huge factor. A DIY project would have eaten up weeks of weekends, but Tuff Shed could deliver and install in just one day. With my packed schedule, this quick turnaround was perfect.
Quality became another deciding factor. DIY kits might cost less upfront, but you need serious skills and the right tools. Prefab sheds are built by pros who know how to make them strong and lasting.
Many DIYers said their mistakes led to problems like leaks and weak structures. Given my basic carpentry skills, these risks made DIY less appealing even with the cost savings.
The convenience of professional installation meant I didn’t have to find materials, deal with permits, or figure out complex construction. Tuff Shed handled everything from design to delivery in a simple, straightforward way.
When I weighed the tuff shed cost against doing it myself, paying for professional construction, saving time, and getting long-term durability was worth the extra money. Sometimes it’s cheaper to pay experts than to do it yourself.
Design and Customization Options
Tuff Shed’s unique customization options drew me in as one of their biggest advantages. The company designs buildings with personalization in mind. They start with standard models but let you modify them extensively.
Choosing the right size and layout
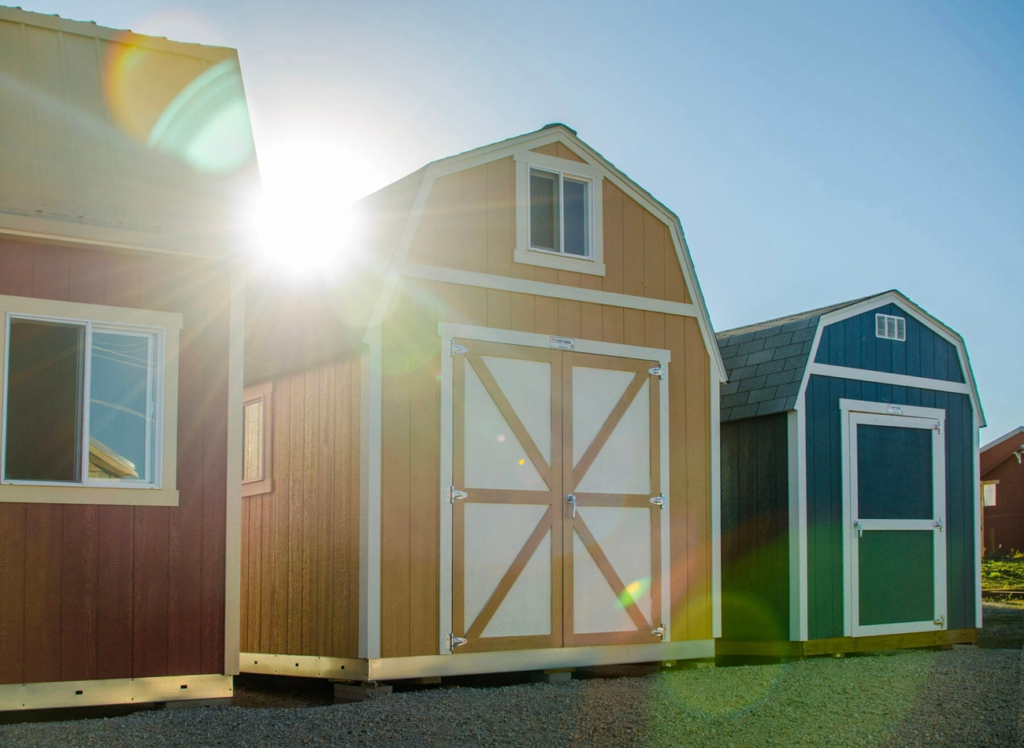
My next step after picking Tuff Shed was selecting the right product line. Tuff Shed gives you three distinct options that fit different needs and budgets. Here’s what I thought about:
- The Garden Series – Their most affordable option, still built with durable materials
- The Premier Series – Their original and most popular line with added headroom
- The Premier PRO Series – Their top-tier line with professional-grade upgrades and superior strength
Size selection turned out to be more complex than expected. Tuff Shed’s buildings work on a sliding scale with 2-foot increments for both width and length. I played around with their online configurator tool to test different dimensions while keeping my available space and intended uses in mind.
Note that most customers wish they had gone bigger when sizing their shed. Empty spaces can trick you – they look huge until you start adding mowers, bikes, tools, and furniture. I measured my largest items and added space to move between them. This practical method helped me avoid getting too small a shed.
Color and trim customization
Maybe the most fun part of designing my Tuff Shed was picking colors. The 24 standard paint colors opened up endless possibilities. Their online configurator let me see different combinations for walls, trim, and door accents – creating over 4,000 possible color combinations.
Tuff Shed rolls on paint instead of spraying it, which improves durability. They apply a double coat and touch up during installation to give triple protection against the elements.
I spent hours playing with color combinations before making my choice. Here’s how colors can affect perception if you need inspiration:
- Red (like Red Gumball) creates energy and makes a vibrant statement
- Green (like Olive Sprig) evokes nature and growth
- Blue (like Seastone or Goblin) promotes calmness
- Gray (trending for exteriors) works for anything from retreats to offices
The wainscot wall upgrade caught my eye since it allows two different colors on the walls plus separate trim and accent colors. This feature adds great curb appeal and lets you create a truly custom look.
You can supply custom paint to match your house exactly if you can’t find your perfect match in standard options. This flexibility made me choose Tuff Shed over competitors.
Adding windows, doors, and vents
Proper lighting and ventilation became key factors to turn a simple storage shed into a functional workspace. Tuff Shed’s window options include:
- Single-hung windows (opening vertically) in three sizes: 18″x24″, 24″x30″ and 30″x42″
- Horizontal sliding windows for a different style
- Transom windows for security with natural light
Door options came in various styles with in-door transom windows – letting light in without compromising security. A single in-door transom window (41″ x 8″) costs $89, while double in-door transom windows (29″ x 8″ each) cost $118 for the pair.
It’s worth mentioning that Tuff Shed strongly recommends vents in every building. Their documentation states, “Along with paint and roofing, there may be no other feature that can help your building perform better”. I planned to insulate my building, so I appreciated their advice about telling them this upfront to design the building properly as an insulated structure.
My research into Tuff Shed reviews showed that customization wasn’t just about looks – it substantially affected functionality. Careful selection of these elements meant my shed would fit my specific needs rather than forcing me to adapt to a standard design.
Tuff Shed Installation Experience
My next step after finalizing design choices was to figure out the purchase and installation process. This turned into quite a learning experience that came with its share of challenges.
Ordering through Home Depot vs. direct
I had to make my first big decision after choosing a Tuff Shed: buy it from Home Depot or straight from Tuff Shed? Both options had their own benefits to think about.
The price difference stood out right away—Home Depot sells Tuff Sheds about $700 cheaper than buying direct from the manufacturer. I wanted to know if this meant any quality differences, but found that there was the same product no matter where you buy it.
Home Depot sweetens the deal with free delivery within 30 miles of their stores. They charge $2.00 per mile beyond that range. Rural customers pay $5.00 per mile for any off-road travel.
Buying direct from Tuff Shed gives you more personal service and sometimes faster scheduling. Both channels use the same independent contractors for installation, despite the price gap.
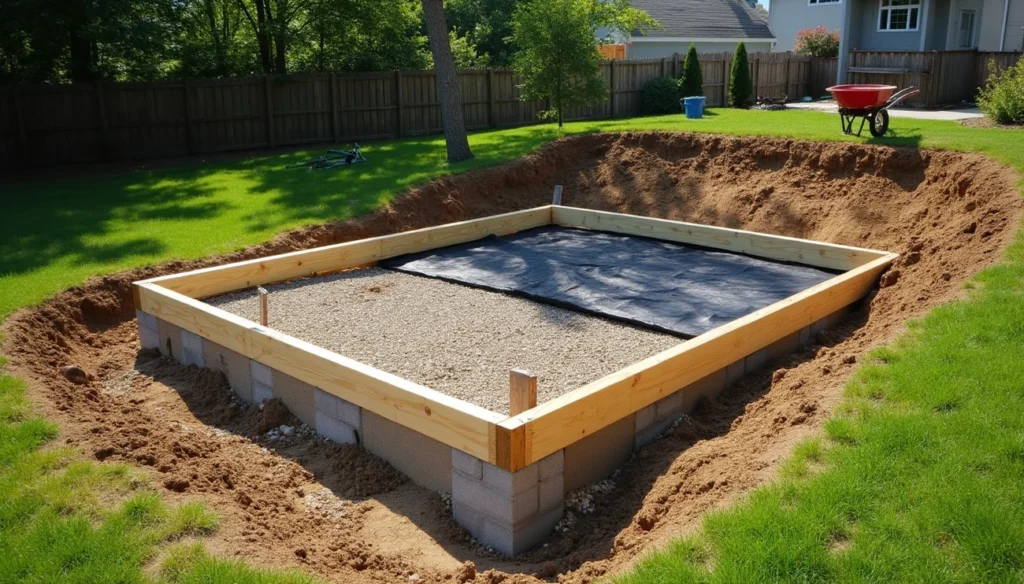
Site preparation and foundation tips
The right site preparation is a vital part of successful installation. Tuff Shed states that this step “is the most important and lasting impact that you can have on your building project”.
Their definition of “level” means the build site surface can’t have more than 4 inches difference from highest to lowest point. Installers need concrete blocks and wooden shims for surfaces outside this range, which might affect the shed’s looks.
Tuff Shed’s drainage recommendations include:
- Picking a high spot in your yard
- Making sure you have 24 inches of workspace around all sides
- Getting rid of debris, tree stumps and animal droppings
- Making built-up soil compact to stop future settling
Most sheds don’t need concrete foundations, but garages must have them. They’re also highly recommended for two-story buildings. My model worked well with Tuff Shed’s steel joist system on well-prepared ground.
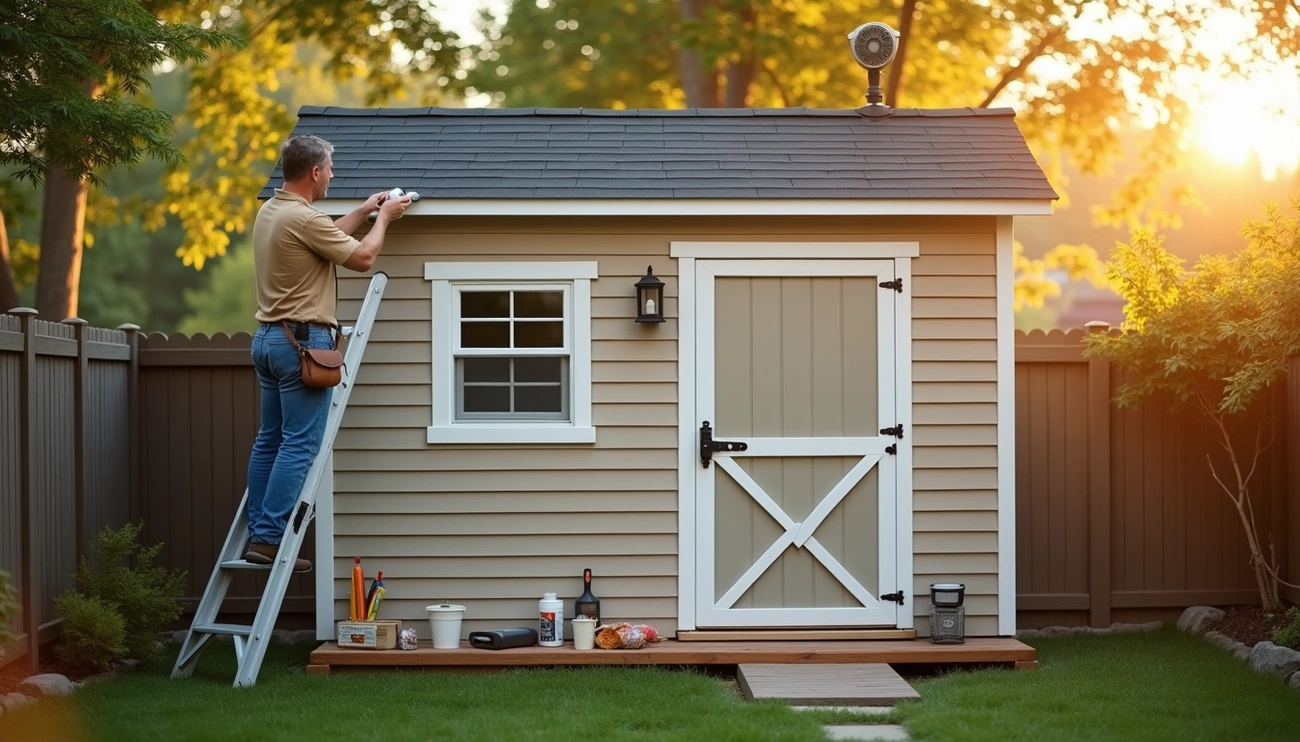
Installation day: what to expect
The Tuff Shed team showed up with pre-made components like wall panels, doors, and rafters. This speeds up construction and lets them build in spots where a finished building couldn’t fit.
Weather doesn’t stop installation as much as you might think. Their documents say, “Rain, snow, and sleet will most likely not prevent installation”. I was impressed by this and their quick work.
Standard storage buildings take less than 8 hours to install. My building took about 6 hours, matching what other customers reported. Garages need more time because they’re more complex.
My installation day checklist included:
- Having an adult (18+) present
- Providing power for their tools
- Being there to confirm the building’s exact spot
- Checking the building before the team left
The installers brought everything they needed and built on-site. They did final paint touch-ups during installation, creating that “triple protection” effect for better durability [previously mentioned in design section].
The installation went smoothly because I prepared my site well. This preparation and Tuff Shed’s pre-made components made the whole experience stress-free—definitely a highlight of my research into tuff shed reviews.
What I Did Myself vs. Hired Out
The installation crew drove away, leaving me with the exciting yet daunting task to turn my empty shell into a functional space. My post-installation changes ended up making the biggest difference in how I use my Tuff Shed today.
DIY insulation and flooring
The insulation process was surprisingly manageable. My 12’x12′ shed needed five rolls of white R-13 Fiberglass Roll Insulation for walls (approximately 200 square feet) and two rolls of R-19 Faced Fiberglass Insulation for ceilings. The difficulty level ranked about 2 out of 10.
My DIY insulation toolkit included:
- Serrated kitchen knife for cutting insulation
- Work gloves (essential – the fiberglass gets incredibly itchy)
- Safety goggles
- Heavy-duty stapler with plenty of staples
- Step stool and ladder for ceiling work
The ceiling insulation posed the greatest challenge. Proper ceiling insulation is vital for temperature regulation in both summer and winter.
The flooring project started with a plan to rip up the existing plywood to insulate underneath. I found this would be unnecessarily complicated since the plywood extended under the walls. Carpet padding and carpet became my solution – a simple fix that improved insulation without sacrificing headroom.
Hiring electricians and HVAC pros
Professional help became essential for electrical and climate control work, though I handled much of the interior work myself. The electrician installed proper wiring for my workspace needs. Any DIY attempts would have violated codes and created safety hazards.
The climate control setup included two window-mounted air conditioners. An HVAC professional guided me on proper placement and ventilation requirements. This combined approach of DIY where possible and professional help where needed balanced cost with quality.
Professional contractors would charge around $6,000 per custom shed for complete builds, according to a YouTube creator who documented building five custom sheds. My strategy of handling insulation and simple finishing work while getting help for complex systems achieved professional results at a lower cost.
Lessons learned from drywall mistakes
Drywall installation proved much more challenging than insulation. The knowledge I have now would have led me to choose 5/8-inch drywall throughout for better fire protection, sound dampening, and resistance to sagging.
Using too thin material became my first mistake. The 2×3 stud walls in my Tuff Shed (common in prefab buildings) needed sturdier material, though many DIYers choose lightweight 1/2-inch drywall for easier handling.
Paper tape creates superior results compared to mesh – a lesson learned after redoing several cracked seams. The barn-style roof added complexity to ceiling drywall installation, with the peak reaching nearly 12 feet. The ceiling work required a helper – something I learned after struggling with the first panel alone.
My finished interior has turned the basic Tuff Shed into a comfortable, year-round usable space that perfectly meets my needs, despite these challenges.
Living With a Tuff Shed: 6 Months Later
My Tuff Shed has been complete for six months now, and I couldn’t be happier with how well it works as a year-round space. Daily use through changing seasons really shows what it can do.
How it performs in hot and cold weather
The Premier PRO model’s radiant barrier siding and roof decking was worth every penny I spent. This innovative material blocks radiant heat and keeps the inside up to 30 degrees cooler than buildings without insulation.
The reflective interior surface does double duty – it bounces back both heat and light. This makes the space cooler and brighter at the same time. Summer afternoons have really shown the value of this feature.
Winter brought a nice surprise when I saw how well the insulation kept the warmth in. Just like another Tuff Shed owner in a mild climate, I sometimes had to open windows after running a space heater for a bit in the morning. You’ll need to think about extra insulation beyond the radiant barrier based on where you live and your local weather.
Noise insulation and comfort
Adding R13 Thermo fiber insulation made a big difference in temperature control and sound dampening. Street noise and outside distractions barely get through now. This creates a peaceful spot where I can focus on work.
I learned that good soundproofing means you need to seal any gaps where sound might sneak through. Modern sound-deadening materials can block up to 80% of unwanted noise. My experience matches these numbers pretty well.
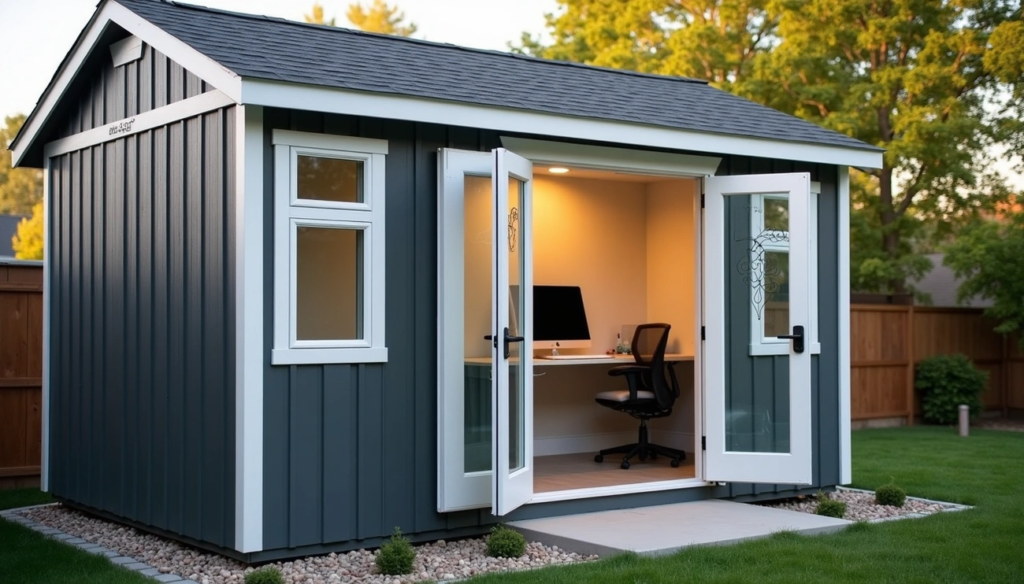
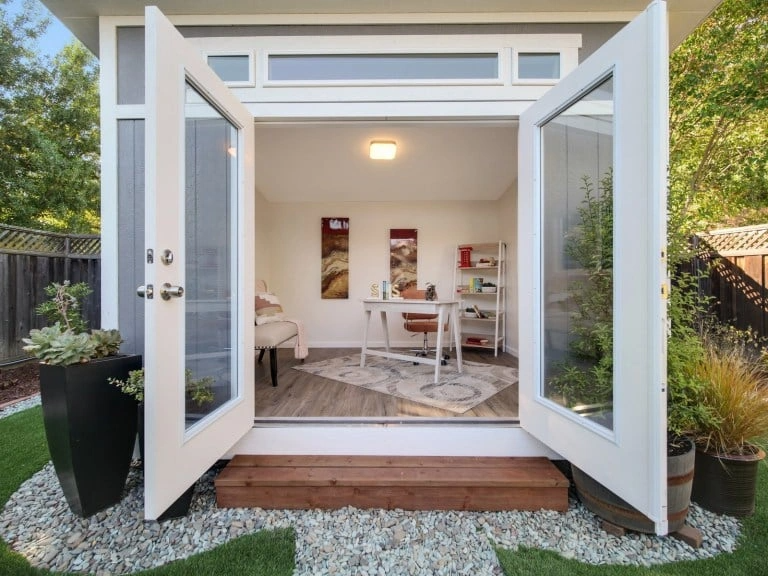
Using it as a home office
The Tuff Shed has completely changed how I work from home. One Tuff Shed customer put it perfectly: “I’ve always enjoyed working from home, and I’m so happy to have my own space back”. That’s exactly how I feel about having this dedicated workspace.
I set up a satellite wifi router that gives me strong internet throughout the building. The air flows nicely thanks to vents on each side plus windows.
Since I spend over 40 hours here each week, comfort is vital. John, another Tuff Shed owner, works 45-50 hours weekly in his backyard office, and like him, I’ve found it’s a great place to get things done.
Looking at various Tuff Shed reviews, most complaints were about installation rather than long-term use. My experience shows these structures deliver great value and functionality once they’re properly finished.
Tuff Shed Cost Breakdown and Value
The real cost of a Tuff Shed goes well beyond the sticker price. My buying journey revealed quite a few surprises when I broke down all the expenses.
Base price vs. upgrades
Tuff Shed’s advertised base prices come with simple construction and installation without extra assembly costs. Base models start around $3,000, while premium garage models can cost over $20,000.
Most reviews don’t tell you about the big price gaps between the three product lines. The Garden Series comes with standard 25-Year GAF shingles. The Premier PRO Series has premium GAF Timberline HDZ Dimensional Shingles and a Manufacturer’s Limited Lifetime Warranty.
The costs add up fast when you customize. Windows cost $89 for single transom and $118 for double transom options. A keyless door handle package starts at $199. Almost every buyer adds several upgrades to their base model.
Hidden costs to watch for
I discovered several extra expenses beyond the base price. Tuff Shed charges $99 to deliver sheds and $375 for garages. Crane delivery for hard-to-reach spots starts at $1,000.
You might also need to pay for:
- Site leveling beyond 4 inches
- Generator rental if you don’t have electricity
- Special handling when clearance is less than 18 inches
People living in high wind zones must pay for mandatory upgrades and permits. These extra costs can bump up your total by 10-15%, as I learned firsthand.
Is it worth the investment?
Monthly payment comparisons tell the real story. A 10×10 climate-controlled storage unit costs about $191 per month. A similar-sized Tuff Shed averages just $86 monthly. Regular storage rentals can cost around $3,800 over a typical 20-month period.
A Tuff Shed boosts your property value, unlike rental storage. One owner paid $30,000 for his Tuff Shed with foundation, compared to $70,000 for a stick-built structure.
The warranty coverage runs from 5 years (Garden Series) to 10 years (Premier PRO). You’ll save time and travel costs with backyard access instead of going to off-site storage.
My experience and complete reviews suggest that Tuff Sheds are worth the investment for homeowners who need extra space, even with the additional costs.
Conclusion
My six-month experience with the Tuff Shed has been better than I expected. The company’s reputation and customization options drew me in at first. The entire experience from choosing to daily use has proven this investment worthwhile. The process had its challenges, but the end result is worth every penny – a functional, comfortable space that fits my needs perfectly.
Here’s what you should know before buying a Tuff Shed: plan your budget beyond the base price. The costs of upgrades, delivery fees, and site preparation add up fast. Notwithstanding that, a properly finished Tuff Shed gives you great long-term value compared to storage rentals or room additions.
The weather performance really impressed me. My shed stays comfortable throughout the year with minimal climate control, thanks to the radiant barrier and proper insulation. The sound insulation turned this separate structure into a quiet workspace away from house distractions.
Of course, making the space my own has been the best part. I needed professional help with electrical work, but I handled the insulation and some finishing touches myself. This saved money and gave me a sense of accomplishment. My tip? Get experts for specialized tasks and take on the simpler projects yourself.
Without doubt, this experience taught me a lot about construction, planning, and patience. The work to be done would have been smoother and cheaper if I knew everything I’ve shared in this piece upfront. But looking at the finished product – a customized, durable space that meets all my needs – those challenges seem minor now.
Should you get a Tuff Shed? Absolutely. You might see some reviews mentioning installation issues, but the quality, versatility, and long-term performance make these structures a great investment for extra space needs. A Tuff Shed offers amazing flexibility at a fraction of traditional construction costs, whether you need a home office, workshop, or storage solution.
FAQs
Q1. How durable are Tuff Sheds in different weather conditions? Tuff Sheds are designed to withstand various weather conditions. The radiant barrier siding and roof decking can keep the interior up to 30 degrees cooler in hot weather. With proper insulation, they also perform well in cold weather, maintaining warmth efficiently.
Q2. What is the average cost of a Tuff Shed? The cost of a Tuff Shed varies widely depending on size and customization. Base models start around $3,000, while premium garage models can exceed $20,000. Additional costs like delivery fees, site preparation, and upgrades can add 10-15% to the total investment.
Q3. Can a Tuff Shed be used as a home office? Yes, many people successfully use Tuff Sheds as home offices. With proper insulation, electrical wiring, and climate control, these structures can be transformed into comfortable, year-round workspaces. The noise insulation and separate location from the main house can provide a quiet, focused environment.
Q4. What are the customization options available for Tuff Sheds? Tuff Sheds offer extensive customization options. These include choosing from different sizes, roof styles, door and window placements, color combinations, and interior finishes. Upgrades such as skylights, additional windows, and specialized flooring are also available to tailor the shed to specific needs.
Q5. How does the installation process work for a Tuff Shed? Tuff Shed installation typically takes less than 8 hours for standard storage buildings. The company delivers pre-fabricated components and assembles them on-site. Proper site preparation is crucial, and the company recommends ensuring the build site is level within 4 inches from highest to lowest point. Professional installation is included in the purchase price.